You test your code. We know you do. How else are you sure that your changes don’t break the program? But after you commit, you discard those pesky scripts and throw away code. Don’t you think it’s a bit of a waste to dump all that effort that took you quite a decent chunk of your day to conjure? Well, here you are, so let’s see another way. A better way.
In the words of Hadley Wickham, author of the testthat package,
in The R Journal:
“It’s not that we don’t test our code, it’s that we don’t store our tests so they can be re-run automatically.”
So now we are going to see how to accomplish this using automated unit testing, leveraging the testthat package.
We’ll cover (pun intended) how much of your code went untested, with the covr package,
and also we’ll learn to test functions independently of their dependencies, making use of mock functions.
We’ll also introduce Test-driven Development, or TDD.
What is a Unit Test?
Unit testing is a method that allows us to check the correct behaviour of a unit of code, which, in the context of R, translates to the correct behaviour of a function.
For a unit test to be good enough, some requirements must be met:
- The whole battery of tests must take as little time as possible, ideally no more than 10 min, so each test should finish as quickly as possible.
- Running a test should report clearly where in the code the errors occurred, if any.
- No manual intervention should be involved.
- Each test should be independent of each other, so running one test should not affect the running of any other.
Let’s review some advantages of proper Unit Testing:
- You’ll save a lot of debug time. And I mean a lot.
- You won’t make the same mistake twice (heh! you wish! ;-P)
- You will promptly discover bugs trying to creep into your code when adding changes to it.
- Enables continuous integration.
- The tests themselves provide documentation for the code.
- When an error occurs, the culprit code is handed to you in a silver platter.
- It forces you to write testable code, and thus improves the overall design.
Unit Testing in R: testthat Library
Setup
# Install package from CRAN only if not installed, and load the library
if (!require(testthat)) install.packages('testthat')
library(testthat)
Expectations
An expectation allows us to assert that the values returned by a function match the ones we should get.
So, for instance, expect_identical(a, b) means
"I expect that a will be identical to b".
Example:
Let’s test the functions my_good_sum(x, y) and my_buggy_sum(x, y),
being OK and broken respectively. On purpose. Ye be warned.
my_good_sum  <- function(x, y) x + y
my_buggy_sum <- function(x, y) x + y + 42

# Pass
expect_identical(my_good_sum(6, 4), 10)

# Fail
expect_identical(my_buggy_sum(6, 4), 10)
## Error: my_buggy_sum(6, 4) not identical to 10.
## 1/1 mismatches
## [1] 52 - 10 == 42Only if the test fails you will have an error message.
Beware!! In computer memory, floats and doubles are stored using IEEE 754 standard format. Due to rounding errors the usual way to compare does not always work.
expect_identical() is going to produce an error:
expect_identical(my_good_sum(0.1, 0.2), 0.3)## Error: my_good_sum(0.1, 0.2) not identical to 0.3.
## Objects equal but not identicalSo, we must use a different expectation this time, expect_equal():
expect_equal(my_good_sum(0.1, 0.2), 0.3)There are more than 20 expectations in the testthat package. They try to answer questions like:
- Are the values equal, equivalent or identical?
expect_equal(x, y)expect_equivalent(x, y)expect_identical(x, y)
- Does the code produce any output/message/warning/error?
expect_output(x, y)expect_message(x, y)expect_warning(x, y)expect_error(x, y)
- How does the returned value compare to a specified value?
expect_lt(x, y)expect_lte(x, y)expect_gt(x, y)expect_gte(x, y)
Multiple Assertions
test_that() allows us to group several expectations that test a function or feature.
test_that("Check commutative property", {
    expect_identical(my_good_sum(4, 6), 10)
    expect_identical(my_good_sum(6, 4), 10)
})

test_that("Check neutral element", {
    expect_identical(my_buggy_sum(0, 0), 0)
    expect_identical(my_buggy_sum(0, 1), 1)
    expect_identical(my_buggy_sum(1, 0), 1)
})
## Error: Test failed: 'Check neutral element'
## * my_buggy_sum(0, 0) not identical to 0.
## 1/1 mismatches
## [1] 42 - 0 == 42
## * my_buggy_sum(0, 1) not identical to 1.
## 1/1 mismatches
## [1] 43 - 1 == 42
## * my_buggy_sum(1, 0) not identical to 1.
## 1/1 mismatches
## [1] 43 - 1 == 42We can see how the naming allows us to identify any failing test more easily.
How to Organize and Run Your Tests
We should have a folder named R with all the R code, and one folder named tests/testthat, where all the test scripts will live.
For each file with R scripts there should be another one with tests, with the same name, but prefixed by test_, as shown:
R/my_program.R <=> tests/testthat/test_my_program.RSo, if you have a file with code, for example in R/code.R:
add_one <- function(x) x + 1your test file should be tests/testthat/test_code.R:
source("../../R/code.R") # This is only needed if your project is not a package

test_that("Add one to 99", {
    expect_equal(add_one(99), 100)
})
From the R console, you can run all tests in a file with test_file("./path/to/file"),
and all tests in a folder with test_dir("./path/to/folder").
Both functions, test_file() and test_dir(), accept a parameter reporter with several options, such as:
- “progress”, which is the default,
- “minimal” if you want a simpler report,
- “location”, which shows the file, line and column of the test run (failed or otherwise),
- “debug”, which allows to debug interactively a failing test and more.
These can also be combined into a MultiReporter, by passing an string vector with several reporters:
test_dir("./path/to/folder", reporter=c("minimal", "location"))Fancy, eh?
See the docs for more details.
It is a best practice not to stop the test battery when one test fails, so that we can gather as much feedback as possible in the least amount of time.
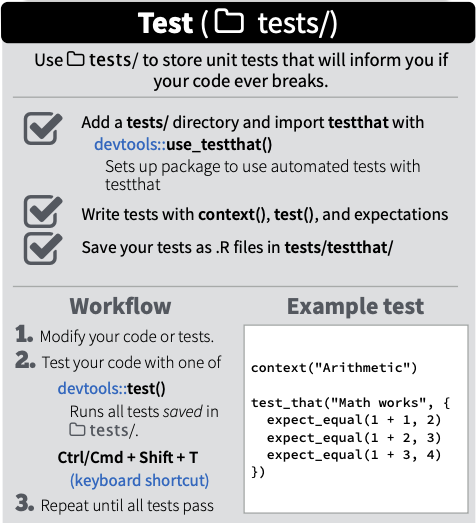
If you want to run all the tests of a package, you just need to press Ctrl/Cmd + Shift + T (from within RStudio), or run devtools::test() from the R console.
You have a nice cheat sheet of the whole process, and more, here: Package Development with devtools Cheat Sheet:
What to Test:
- Valid inputs.
- Invalid inputs.
- Errors, exceptions, and events.
- Everything that might break.
Test Coverage
The covr package helps you check how much of your code is actually being tested.
It shows which lines of code are being tested by your tests, and which are not.
It usually measures coverage as a ratio, e.g. 60% of all lines, functions, etc.
Setup
# Install package from CRAN only if not installed, and load the library
if (!require(covr)) install.packages('covr')
library(covr)
Test Coverage of a Whole Package
If you want to check the coverage of a package, you simply have to:
covr <- package_coverage(path="./path/to/package")
covr
report(covr)
Coverage of Individual Files
Say you have this R script (and its companion test):
# R/sign_of_product.R
sign_of_product <- function(x, y) {
    if (x < 0) {
        if (y < 0) {
            return("Positive")
        } else {
            return("Negative")
        }
    } else {
        if (y < 0) {
            return("Negative")
        } else {
            return("Positive")
        }
    }
}

# tests/testthat/test_sign_of_product.R
test_that("Sign of the product", {
    expect_equal(sign_of_product(1, -1), "Negative")
    expect_equal(sign_of_product(-1, -1), "Positive")
})
You can check the test coverage for just R/sign_of_product.R like this:
covr <- file_coverage("R/sign_of_product.R", "tests/testthat/test_sign_of_product.R")
covr
report(covr)
In the “Source” tab you will see a report that shows which lines have been tested and which have not.
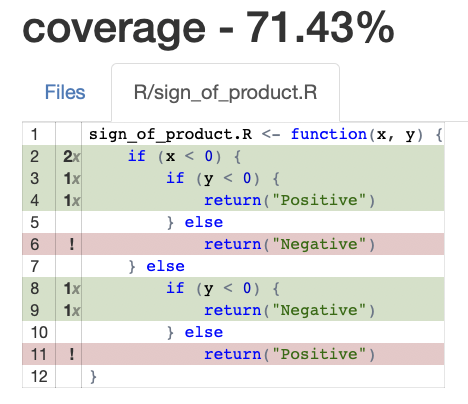
Oops! You can see some red lines there. How many tests will I have to do?
If your code has if-else blocks, you have to ensure that both paths of each if are tested. If if-else blocks are nested, the number of cases to test increases exponentially. See Cyclomatic Complexity for a more detailed explanation.
Now, let’s get to it.
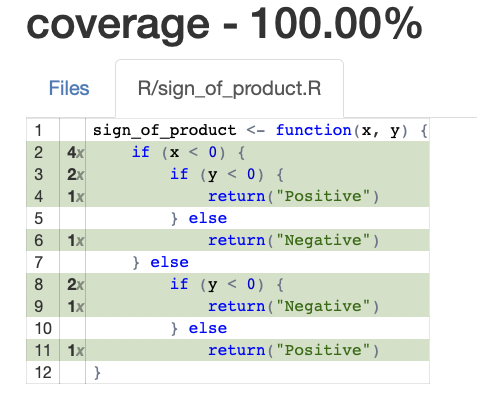
# tests/testthat/test_sign_of_product.R
test_that("Multiplication sign", {
    expect_equal(sign_of_product(1, 1),   "Positive")
    expect_equal(sign_of_product(-1, 1),  "Negative")
    expect_equal(sign_of_product(1, -1),  "Negative")
    expect_equal(sign_of_product(-1, -1), "Positive")
})
Yay! Now we have achieved 100% test coverage. Get a juice box.
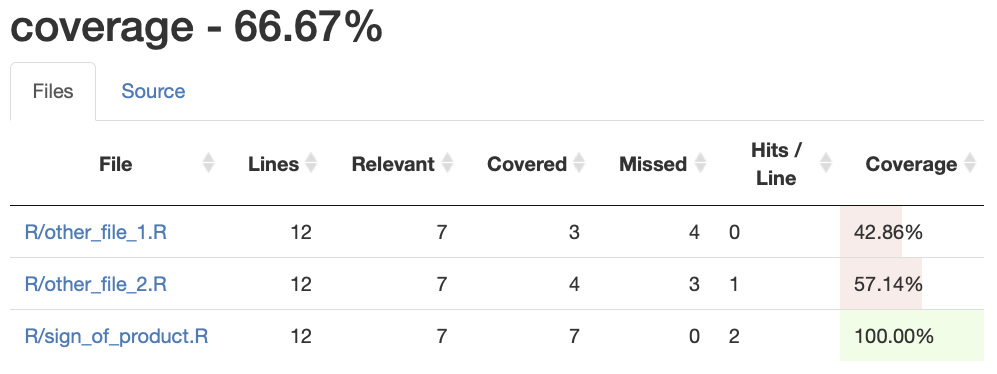
If you have multiple files in the R folder
and their corresponding test files in the tests/testthat folder, then if you do:
covr <- file_coverage(
    c(
        "R/mult_sign.R",
        "R/other_file_1.R",
        "R/other_file_2.R"
    ),
    c(
        "tests/testthat/test_mult_sign.R",
        "tests/testthat/test_other_file_1.R",
        "tests/testthat/test_other_file_2.R"
    )
)
covr
report(covr)
you get a nice “Overall report”, with the files with less coverage at the top:
Mock Functions
A function typically calls other functions, that we call dependencies.
A mock function replaces a dependency during a test, and must be implemented in a way that allows us to test the caller function.
To illustrate this, let’s say we are testing a function that depends on
a function get_json(...) that connects to an external REST service
and returns some JSON payload.
We should then replace get_json(...) with a mock function,
that forcibly returns a sample JSON of our choice:
# The real `get_json()` is defined elsewhere, and is probably quite complex
# Mocked `get_json()` function:
get_json <- function() {
  '{"user": "Jane Doe", "age": 42}'
}
This will enable us to write a unit test of the caller function.
Now, should we then mock all of the dependencies? Let’s look into this a little bit.
Some of these dependencies may be well tested already, for instance, if they belong to the standard library of the language, or to a well-established package. In that case, mocking those would be redundant, wouldn’t it?
Not so easy, cowboy.
Even if well-tested, we might benefit from mocking them in these two scenarios:
The dependent function, although well tested, is not pure, and all functions that access an external resource (e.g., REST services or external databases) fall into this category.
The dependent function, although pure, takes a lot of time/resources to execute (is expensive).
This strategy gives us the additional advantage of being able to test functions that have dependencies that are not yet implemented, which is commonplace when writing new code.
Note that since version 2.0.0 of the testthat package,
you can’t mock functions in base packages
Let’s now see how testthat simplifies using mocked functions:
# R/salary.R
get_gross_salary <- function(employee_id) {
    # Get the gross salary for the employee whose ID is employee_id
    # possibly from an external database or web service
}

net_salary <- function(employee_id, tax) {
    if (!is.numeric(tax)) {
        stop("Input type is not numeric")
    }

    gross_salary = get_gross_salary(employee_id) # External function call

    return(round(gross_salary * (1 - tax), digits=2))
}


# tests/testthat/test_salary.R
test_that('Net calculation works OK', {
    local_mock(get_gross_salary = function(x) 1000 )
    # Now the call of get_gross_salary() always returns 1000
    expect_equal(net_salary(456, 0.20), 800)
    expect_equal(net_salary(70, 0.15), 850)
    expect_error(net_salary("str"))
    expect_error(net_salary("100.50"))
})
We’ve used local_mock() within a call to test_that(). This has the effect of mocking the desired function in all the tests defined within the test_that() block.
But sometimes we want to be more specific, and mock a function just for a test. We can then leverage the with_mock() function.
See the docs for the gory details.
Test-driven Development (TDD)
Test-driven Development, or TDD, is a software development process where you write a test before you write the actual code you are trying to test.
Let’s begin with a simplified TDD workflow:
- Let’s suppose we start a project from scratch.
- RED. Write a test. Run it. It must fail, hence the “RED”.
- GREEN. Write “just enough” code, the simplest possible, to pass the test. Even if it looks silly. We are then “GREEN”.
- REFACTOR. Work on the code to remove any duplication we might have added for the test to pass. Only if needed. Naturally, not on the first iteration of this loop.
- Jump to step 2 and start again.

By Xarawn - Own work, CC BY-SA 4.0, https://commons.wikimedia.org/w/index.php?curid=44782343
Benefits of TDD
- It ensures that we get the desired result.
- It compels us to produce testable code.
- It serves as a guide in case we don’t know where to start but we are clear on what we want to get.
- Let’s be honest, if we manage to get working code, there is little chance that we’ll devote time to write tests later.
- It’s a good complement to the documentation of the project.
TDD in Action
Let’s see how to apply TDD in practice.
The target of this section is to create a function, my_factorial() that satisfies the following:
- Requirement #1. The result of
my_factorial(0)must be 1. - Requirement #2. Choose a number n;
my_factorial(n)should return the product of all positive integers less than or equal to n. - Requirement #3. If n < 0 or n > 14,
my_factorial(n)should return NULL. Why? Because the numbers get so huge that up to 14 we can get integers, but from 15 onwards we’ll get only floats, or worse, overflow. - Requirement #4. The function should only accept integers.
Let’s tackle them one at a time.
Requirement #1: The result of my_factorial(0) must be 1
Step 1 (RED). Write the first test:
# tests/testthat/test_myfactorial.R
test_that("Valid arguments", {
    expect_equal(my_factorial(0), 1)
})
## Error: Test failed: 'Valid arguments'
## * could not find function "my_factorial"
## 1: expect_equal(my_factorial(0), 1) at <text>:3
## 2: quasi_label(enquo(object), label, arg = "object")
## 3: eval_bare(get_expr(quo), get_env(quo))As expected, the test has failed. Be wary otherwise.
Step 2 (GREEN). Write the minimum amount of code that makes the test pass:
# R/myfactorial.R
my_factorial <- function(n) 1 # Looks like cheating, but bear with me!

# tests/testthat/test_myfactorial.R
test_that("Valid arguments", {
    expect_equal(my_factorial(0), 1)
})
Congrats! The code now passes the test, yay!
Requirement #2: Choose a number n; my_factorial(n)
should return the product of all positive integers less than or equal to n
Step 1 (RED). Write a test:
# tests/testthat/test_myfactorial.R
test_that("Valid arguments", {
    expect_equal(my_factorial(0), 1)
    expect_equal(my_factorial(3), 6)
})
## Error: Test failed: 'Valid arguments'
## * my_factorial(3) not equal to 6.
## 1/1 mismatches
## [1] 1 - 6 == -5Step 2 (GREEN). Write the minimum amount of code that makes the tests pass:
# R/myfactorial.R
my_factorial <- function(n) {
    ifelse(n == 0, 1, 6)
    # Hey! This definitely looks like cheating! What are you up to?
}

# tests/testthat/test_myfactorial.R
test_that("Valid arguments", {
    expect_equal(my_factorial(0), 1)
    expect_equal(my_factorial(3), 6)
})
Test passing now.
Step 3 (RED). Write yet another test:
# tests/testthat/test_myfactorial.R
test_that("Valid arguments", {
    expect_equal(my_factorial(0), 1)
    expect_equal(my_factorial(3), 6)
    expect_equal(my_factorial(10), 3628800)
})
## Error: Test failed: 'Valid arguments'
## * my_factorial(10) not equal to 3628800.
## 1/1 mismatches
## [1] 6 - 3628800 == -3628794Step 4 (GREEN+REFACTOR). We don’t have a choice but to refactor. The tests already in place will keep our new code true!
# R/myfactorial.R
my_factorial <- function(n) {
    if(n == 0) return(1)

    factorial <- 1
    for(i in 1:n) {
        factorial <- i * factorial
    }
    return(factorial)
}

# tests/testthat/test_myfactorial.R
test_that("Valid arguments", {
    expect_equal(my_factorial(0), 1)
    expect_equal(my_factorial(3), 6)
    expect_equal(my_factorial(10), 3628800)
})
Test passing now.
The final two requirements are left as an exercise to the reader (go on, don’t be shy!).
The final result might look something like this:
# R/myfactorial.R
my_factorial <- function(n) {
    stopifnot(is.numeric(n))
    if(n < 0 | n > 14) return(NULL)
    if(n == 0) return(1)

    factorial <- 1
    for(i in 1:n) {
        factorial <- i * factorial
    }
    return(factorial)
}

# tests/testthat/test_myfactorial.R

test_that("Valid arguments", {
    expect_equal(my_factorial(0), 1)
    expect_equal(my_factorial(3), 6)
    expect_equal(my_factorial(10), 3628800)

    rnd_num <- sample.int(14, 1)
    expect_is(my_factorial(rnd_num), "numeric")
})

test_that("Null for negatives", {
    neg_num <- -sample.int(100, 1)
    expect_equal(my_factorial(neg_num), NULL)
})

test_that("Null for numbers bigger than 14", {
    num_bigger_than_14 <- 14 + sample.int(100, 1)
    expect_equal(my_factorial(num_bigger_than_14), NULL)
})
Beyond Unit Testing
Integration
CAVEAT EMPTOR! Your code can pass all the unit tests, with a 100% coverage, and still have problems!

These are called integration problems, which are tackled using integration tests. This form of testing comprises tests that, ahem, test more than one unit (read: function) at a time.
Hints for Testing in Data Science and Machine Learning
When working with Machine Learning models, due to their random nature, it is not practical to do unit testing.
We can opt to set the seed for the pseudo-random number generator to a known value,
in order to be able to predict the results that we’ll obtain from the training.
This can be accomplished in R with set.seed().
On the other hand, without having to set the seed, there are a bunch of approaches we can leverage to ensure the fitness of the obtained output. These are some of them, which fall into the fuzzy test category:
- Ensure that the type of the result matches what we expect,
such as
string,integer, ordataframewith all required columns in place… - Ensure that the output falls in the expected range. For instance, R2 of a linear regression must always be between 0 and 1.
- Ensure that the output data fits the expected statistical distribution.